while building i'm enjoying this little beast, soooo fun to fly!!
Friday, 22 April 2011


Thursday, 21 April 2011
Fin and Rudder
here i am with some work done! job is stealing some time to work on my beauty, but i'm keeping on...
before continuing with trim and balance tab for elevators, i focused on fin and rudder.
here some pictures:
let's start with the fin..usual old skeleton, only four ribs.

the sheets, previously prepared...


other side..

and the leading edge is sanded!

and now the rudder, three pieces to glue together to make the base

a shaped LE , slide the base in the slot and it's done

wrote down the ribs

cut all the ribs and glued to the base


now the balance tab LE, the maxi root rib and the torque block...

this time i did it quicker, all the sanding went well and the profile is good, much better than the elevators.


next time i'll drill the hinges holes for the rudder and prepare for hiding the mechanism. still a lot of work to do!! see you next time
before continuing with trim and balance tab for elevators, i focused on fin and rudder.
here some pictures:
let's start with the fin..usual old skeleton, only four ribs.

the sheets, previously prepared...


other side..

and the leading edge is sanded!

and now the rudder, three pieces to glue together to make the base

a shaped LE , slide the base in the slot and it's done

wrote down the ribs

cut all the ribs and glued to the base


now the balance tab LE, the maxi root rib and the torque block...

this time i did it quicker, all the sanding went well and the profile is good, much better than the elevators.


and finally i inserted the aluminium tubes to place and replace the hinges as many times i desire..

next time i'll drill the hinges holes for the rudder and prepare for hiding the mechanism. still a lot of work to do!! see you next time
Thursday, 31 March 2011
Concealed Elevator Hinges
Hi all,
yes i've been away from my sweet baby too long, but i've got an excuse.
in the next posts i'll start publishing the first prototype of the all-electric rotating metal main gear. it's sooo cool, and it uses the real scale rotating mechanism. there's still some work to do (much work) but the main body, the inside oleo, the "scissors" and other minor things are almost ready...stay tuned for some pictures.
in the meantime, i had a few moments to work on my stabs.
started to make concealed hinges, for better scale looking.
used some plywood, carved a long slot and slow glued it to the stab body. three made, one to go, maybe tonight...


I chose to shape the leading edge of the elevators in an unusual way.
not rounded shape, not v shape, but a double beveled shape that copies perfectly the concealing plywood on the stabs.


i bought the greatplanes tool to calculate the elevator (and other mobile parts) movement.
on the manual it should be 19 millimeters; i did, on the first try, 20, but with all the glassing and covering i think it will become more like 17-18.
so, see you soon with some other news and the main gear pictures.
be patient..
Thursday, 10 March 2011
hinges and company
Ok, been away for a while, in the meantime, i bought a foamy, a parzone p51 bl, and a new radio, an economic spektrum 5 ch;
but i did some work too, in fact the elevators now have the right shape, and had been sanded to copy the stabs' shape. i made hinge holes on the stab and on the elevators.


i'm using robart type of hinges. they will go in stabs holes with a socket, an alluminium tube, to let me assemble and disassemble the tail without making a mess.


and here it is! the work is done, the hinges stay in place perfectly.
i've tried to assemble the three pieces, to check how they fit.


I'll have to add some balsa in front of the balance tabs, and give it shape to fit the movement of the elevator part without getting in the way.
then i'll shape the leading edge of the elevators and study a method to use some plywood and do a lip to hide the hinges. i'm keeping being sooo sorry for the horizontal shape of stabs, it's not taped....i'm thinking about making another one more scale...dunno. see you soon
but i did some work too, in fact the elevators now have the right shape, and had been sanded to copy the stabs' shape. i made hinge holes on the stab and on the elevators.


i'm using robart type of hinges. they will go in stabs holes with a socket, an alluminium tube, to let me assemble and disassemble the tail without making a mess.


and here it is! the work is done, the hinges stay in place perfectly.
i've tried to assemble the three pieces, to check how they fit.

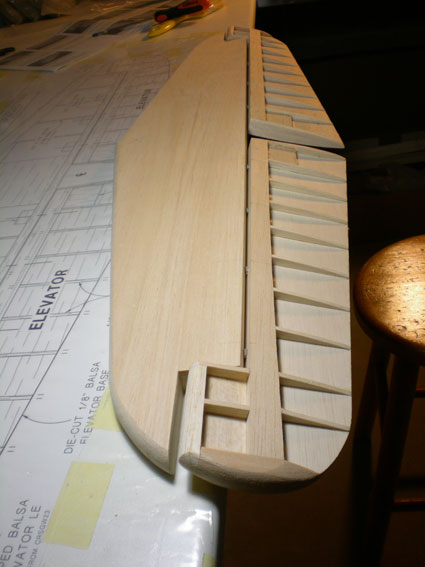
I'll have to add some balsa in front of the balance tabs, and give it shape to fit the movement of the elevator part without getting in the way.
then i'll shape the leading edge of the elevators and study a method to use some plywood and do a lip to hide the hinges. i'm keeping being sooo sorry for the horizontal shape of stabs, it's not taped....i'm thinking about making another one more scale...dunno. see you soon
Monday, 28 February 2011
Round and round...
Kept working on the ailerons, not without some head-scratching issues..
Rounded tips now, and balance tab too!

i discovered that in top flite GS corsair the balance tabs of ailerons are not intended to be scale; the tip of the balance tab, in fact, in real scale f4u was rounded and the stab, in that point, was "carved" to let the balance tab move freely. not in this kit! the rounding of the tab is only slightly curved and then it's flat; the building manual is silent about it, but i'll try to do it as scale as possible. so i will glue a flat surface on the stab, just in front of the balance tab ( to fill the gap that in this point is important) and then carve it to make a shape that will "hug" the balance tab. ok, stop writing.


I left behind the stab sanding so now i'm on it. i draw a line in the center to ensure to sand simmetrically.
I used the Graal of sanding, the great planes multi sander, sanding LE or TE made easy.


First half done...

..and that's it!

Rounded tips now, and balance tab too!

i discovered that in top flite GS corsair the balance tabs of ailerons are not intended to be scale; the tip of the balance tab, in fact, in real scale f4u was rounded and the stab, in that point, was "carved" to let the balance tab move freely. not in this kit! the rounding of the tab is only slightly curved and then it's flat; the building manual is silent about it, but i'll try to do it as scale as possible. so i will glue a flat surface on the stab, just in front of the balance tab ( to fill the gap that in this point is important) and then carve it to make a shape that will "hug" the balance tab. ok, stop writing.


I left behind the stab sanding so now i'm on it. i draw a line in the center to ensure to sand simmetrically.

I used the Graal of sanding, the great planes multi sander, sanding LE or TE made easy.


These are the results, easy task with the Graal!

First half done...

..and that's it!

Next step will be to sand and cut the ailerons' ribs and give them the right profile.
I noticed (sadly too late) that the stabs are not scale too! the entire surface is flat in this kit but in the real plane the two halves were taped, and the tips were significantly thinner than the roots. i would be forced to start all the project over, but now that i started i won't stop. maybe i'll reproject some stabs and ailerons later in the building, in exact scale...maybe...later...
see you!
Friday, 25 February 2011
Elevators
Did some work on elevator, and finished trimming the stabs; now all the surfaces are even..

started the elevator..once i had the balsa stick glued, i realized one of the sticks was bent, very much bent!!
i had to sand it to fix it, result is good..


Than i added the ribs, 10 for every side... 4 SIDES! ..boring..


Here the assembly, man those are heavy! some glue drops ruining the picture..


next step is building the balance tab, one of the best features of the real corsair, that gives that smooth looking shape.


then the tab closing ribs, and the tips..these balsa tips are reeeealy soft... don't clamp 'em for any reason!!


now i'll have to glue the fake mini-ribs on balance tabs, install the torque rods blocks, and give the shape a reason to be, sand sand sand...
I need to look at some photos to understand the le shape of ailerons and the way they're hinged.
then the stabs le, sand sand sand and finally the balance and trim tab, to make it more scale.
see you!!
Wednesday, 23 February 2011
Stabs
I removed the wood wafers from the clamps, and sanded the edges. glued together and to LEs.

The LE doubler, the triangle, is fatter than the rest, will have to sand it flush..
this is the effect...

Next step the TE, the wood stick is a little bent, maybe the humidity during the transportation (the kit is as old as 5-10 years), i'll fix it with the ribs.

Cut the ribs, with a little bevel to copy LE inclination. Glued the ribs..


Then I glued the first skin to the back of the stabilizer.I use thick CA glue 'cause it gives me the time to reposition a little the framework on the skin before it cures (few seconds).

After that it's time to cut the hinge blocks, 8 of them. and glue 'em.

Trimmed the back skin; i left 5 mm of skin on each side, my exacto knife is that thick...


at last, the front skin, with some weights on it, i'll let everything cure for the night.
see you tomorrow!!

Subscribe to:
Posts (Atom)